
Videography Online Help
Welcome to the Videography Online Help. Select one of the links to jump directly to a specific section. More sections will be available soon.
Camera View
Overall settings
Detection Mode
Automatic Tracking
Camera view

Top toolbar
From left to right: Switch between front/back camera, control torch, toggle video stabilisation, toggle automatic white-balance and open the detailed settings for current camera mode.
Mode picker
Swipe left or right to change the camera mode. You can choose between Slow Motion, Video, Photo and Detection Mode. On an iPhone 4, only Video and Photo mode are supported.
Exposure control
Drag to position the exposure point of interest. Tap with two fingers on the camera view if the blue exposure control is not visible. Tap inside the circle to lock/unlock exposure.
Focus control
Drag to position the focus point of interest. Tap inside to lock/unlock the focus.
Time factor
Slide up and down to adjust the time factor for video recording. A factor below 1.0 creates slow motion videos, a factor above 1.0 creates time-lapse videos. Tap inside to turn time-lapse on and off.
Zoom factor
Slide up and down to adjust the zoom factor.
Bottom toolbar
From left to right: Open the media library, show quick help, start recording, take a picture, open overall settings.
Overall settings
Open the overall settings by tapping the ’screwdriver‘ icon in the lower right corner of the camera view. The overall settings apply to all camera modes at the same time.
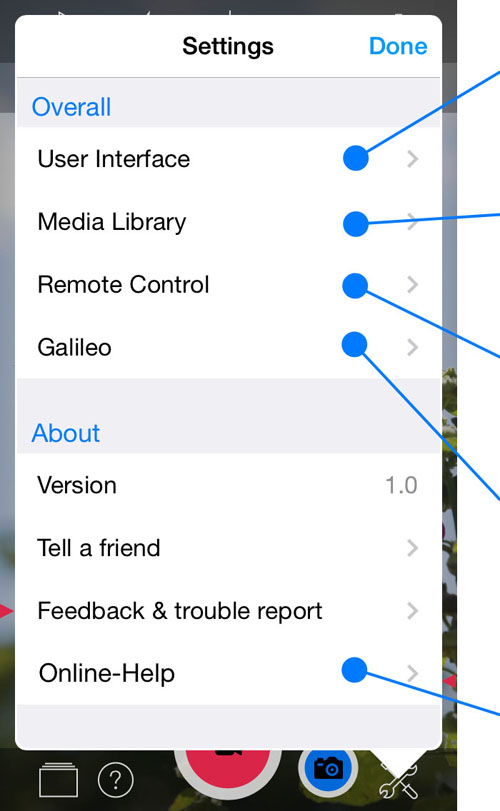
User Interface
Contains all settings related to the user interface, such as interface rotation, the grid overlay, gyro based horizon, photo preview or settings a password at app start.
Media Library
Here you can choose the locations where your recordings get stored, for example locally in the app, in the camera roll, your Dropbox or automatically distributed via mail.
Remote Control
Configures the browser access to your camera. Here you will find the address to enter in your browser to access your camera remotely.
Galileo
Contains all settings to connect the app with your Galileo robotic motion platform and to setup the automatic tracking.
Online Help
Opens this online help within the App.
Detection Mode
Activate the detection mode by dragging the mode picker to the very left. The top toolbar will then show a motion level and audio level indicator. Adjust the threshold by dragging the thumb in the indicator left or right. When the motion or audio level crosses the threshold, the respective indicator is flashing red. By selecting the gear icon on the very left of the top toolbar, you can open the detailed settings for the detection mode:
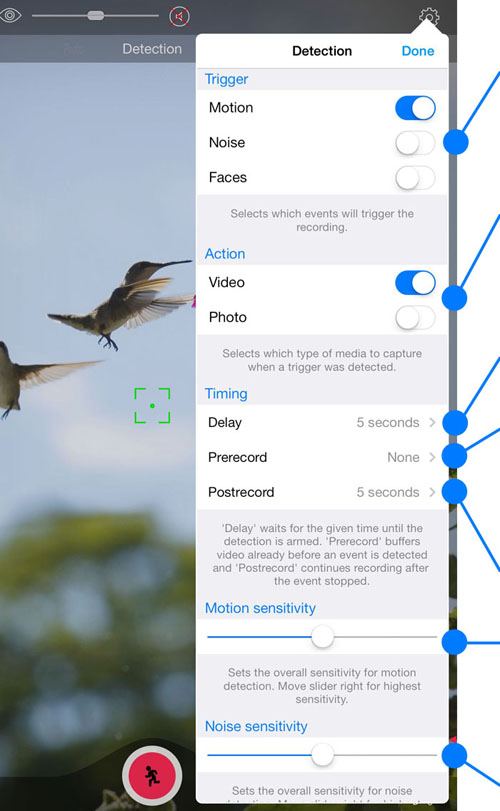
Trigger Switches
Activates the events that should trigger a recording. ‚Motion‘ reacts to movements in front of the camera and will show a live heat map of the motion level in the camera view. ‚Noise‘ reacts to audio audio and ‚Faces‘ enables the face detection.
Action Switches
Selects which type of media should be recorded after a trigger was detected. You can choose between video recording, capturing still images or even both at the same time.
Delay
Configures the duration the detection will pause after each recording, until it is armed again.
Prerecord
The duration of video that will be buffered already before a trigger is detected. Activate only when really needed, as it will increase the battery consumption.
Postrecord
The duration of video that will be recorded after a trigger was detected.
Motion sensitivity
Drag the slider to adjust the sensitivity for the motion detection.
Noise sensitivity
Drag the slider to adjust the sensitivity for the audio detection.
Automatic Tracking
To configure the automatic tracking, open Videography’s general settings by tapping the screwdriver icon in the lower right corner of the camera view. You’ll find the tracking settings by selecting the ‚Galileo‘ submenu:
Galileo activation switch
Turn on this switch to connect Videography to your Galileo platform. If you own a Bluetooth Galileo, twist it’s base to initiate the connection. When pairing is successful, the status will show ‚connected‘. Choose ‚Get Galileo‘ to get a promo code for a discount when buying a Galileo in the Motrr Online Shop.
Tracking Switch and Zoom
Turn on to activate the automatic tracking. Videography can not only control the position, but also automatically adjust the maximum zoom level. The ‚zoom‘ submenu allows you set the zoom level, zoom speed and target object size.
Objects
Here you can activate which objects Videography will track. When you activate motion tracking, please make sure the motion threshold is set appropriately (see detection mode). It is also recommended you lock the focus (tap into focus square on camera view), because the motion detection gets paused when the camera is focusing. When you activate color tracking, a new menu item appears that lets you choose the tracked color. You can choose a color either by taking a picture of the object you want to track or by selecting it from a color picker. The color of the menu item indicates the color that is currently selected.
Reference point
Sets the time after which the device should return to a reference position, when no object is detected. The reference position is set either by long-tapping on the camera view, or by manually positioning the device when there is no activity.