
How to AirBeam via cellular?
One of the most frequently asked questions about AirBeam is how to setup a WiFi router to allow monitoring the cameras at home from anywhere in the Internet – including a cellular connection. This guide shows you step by step how to setup your WiFi router appropriately. As there are hundreds of different WiFi routers out there, steps might be slightly different. However, the general principle remains the same. If you have suggestions or feedback to this guide, let us know.
Step 1: Create a DynDNS account
If you haven’t got configured Dynamic DNS for your router yet, first create an account with a Dynamic DNS provider. This will allow to reach your camera via a fixed host name instead of having to always look up the public IP address of your router. Free DynDNS accounts are provided for example by http://no-ip.com.
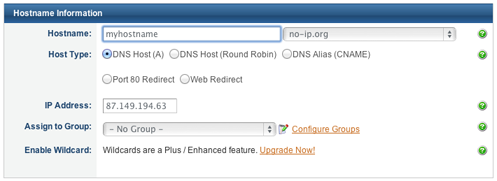
When you’ve signed up, create a new host and choose a hostname (must be globally unique) as you like and select a postfix, e.g. “no-ip.org”. This will be the hostname you will later use to connect to you camera device. If you register with no-ip.com, it looks like this:
Step 2: Configure your router to use the DynDNS account
- Log into the routers configuration web page with a browser.
- Go to the DynDNS settings page. Depending on your router model it might be called DDNS or something similar.
- Enable the DDNS Service. Enter the user name and password you’ve provided when creating the DynDNS account in Step 1. Provide the full hostname you’ve selected in the first step, e.g. “myhostname.no-ip.org”.
- Apply the settings. Usually the router will prompt if the settings were successfully activated.
Step 3: Test if your DynDNS setup works
Open up a terminal window (Mac, Linux) or command line (Windows) and “ping” your newly created public hostname by entering the following command:
ping myhostname.no-ip.org
If there’s a reply, great – your WiFi router now has a public hostname that can be reached from the Internet.
If not, review step 1 & 2 carefully again.
Step 4: Configure port forwarding
- Look up the IP address of your camera device on AirBeam’s setting page
- Go again to your WiFi router setup page, now select a tab called “Virtual Servers” on most router models.
- Choose two empty rows and create the following two entries:
First entry (needed to access camera remotely via AirBeam app):
- LAN IP Address must be the address of your camera device you have looked up
- Set protocol type to TCP
- Set LAN port to 8123
- Choose an unused public port freely, let’s say 8200 (may not be used in other rows)
Second entry (needed to access camera remotely via a browser):
- LAN IP Address must be the address of your camera device you have looked up
- Set protocol type to TCP
- Set LAN port to 80 (or 8124 if your camera device is a Mac with AirBeam Pro for OSX
- Choose another unused public port, let’s say 8201 (may not be used in other rows)
If you want to expose a second camera, enter additional rows with the IP addresses of the second camera. Of course the public ports needs to be different from the first camera.
Step 5: Test if manual connection works
- Start up AirBeam on your camera device and switch it to camera mode.
- Start up AirBeam on your monitor device. On the monitor tab, hit the “connect manually” button in the lower right corner. If both devices are on the same WiFi, the camera probably shows up already, but that doesn’t disturb the test.
- Enter your public hostname from step 1 and the public port you have chosen in step 4, separated by a colon.
For example: myhostname.no-ip.org:8200 - Hit the connect button. If the setup worked, the camera should show up in the monitor window (a second time if both devices discovered each other already automatically).
- Test your second port forwarding with a browser by entering the URL: http://myhostname.no-ip.org:8201
Step 6: Optimize AirBeam’s settings for a cellular connection
To optimize AirBeam for use over a 3G connection, you should finally adjust a few settings.
- Audio codec: By default AirBeam uses high bit rate PCM for audio streaming. For 3G you should choose a lower bit rate codec like AAC or IMA4 in AirBeam’s audio settings.
- Video frame rate: It is recommended to set the video frame rate to 5 frames per seconds – otherwise AirBeam will automatically reduce image resolution and quality to sustain higher frame rates over a 3G connection.
- Video resolution: Medium or low resolution settings is recommended. High resolution requires more bandwidth than offered by a 3G connection.